
How to easily change a rivet on a snowshoe
Installation Guide
Strap - Binding - Harness - Attachment

DIY 4-step guide: repairing and replacing a snowshoe part
(straps, bindings, attachments, harnesses) for MSR, Atlas, Tubbs, GV, LG and all brands
This guide explains, step by step, how to remove rivets and replace a spare part safely and efficiently, without damaging components. Before any repair, it is essential to understand and follow the proper method for removing a rivet. If the installation seems complex, it is recommended to seek assistance from a specialized workshop.
A basic level of repair knowledge and proper tool handling are required on your part. Before starting, make sure you are working in a clear, well-lit workspace. Safety must always be your top priority.

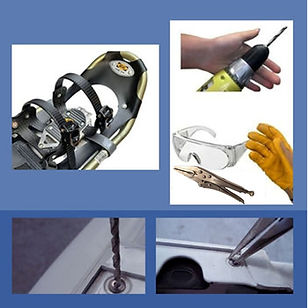
⚙️ Preparatory step for removing a rivet
-
These steps will help you accurately repair and extend the life of your snowshoes.
-
With the right tools and a simple method, repair becomes quick and safe.
-
Prepare your workspace, gather all the necessary materials.
-
Follow safety rules before handling your tools.
-
MSR - ATLAS - TUBBS - GV - LG & ALL OTHER BRANDS
Step 1: Prepare your tools !
-
Drill equipped with a suitable drill bit:
-
-
Standard snowshoes: 3/8 in (4.76 mm) sharpened drill bit or ¼" (6.35 mm) sharpened drill bit
-
-
Vice-Grip type pliers or locking pliers
-
Safety glasses and work gloves
-
Cutting lubricant for drilling rivets
-
Clean cloth for cleaning the drains
-
Keep your washers so you can reuse them during your next installation.
-
Screwdriver and/or rivet gun (for reassembly)
Step 2: Work safely
Before starting, make sure you have all the necessary equipment and are familiar with the safety rules for your tools.

⚠️ Safety before drilling
-
The main risk during drilling is the ejected metal fragments.
-
These particles can cause serious eye injuries.
-
👁️ Always wear safety glasses and keep people at a distance.
-
Work on a stable and clear surface before any handling.
Step 3: Rivet drilling method !
-
Put on your gloves and safety glasses.
-
Hold the washer with locking pliers to prevent it from spinning.
-
Use a drill bit that matches the exact size of the rivet (3/16" or 1/4") to drill out the rivet.
-
Apply a small amount of oil into the rivet hole, then slowly drill through the center.
-
Hold the drill firmly at low speed to prevent material overheating.
-
Monitor the risk of metal overheating during drilling.
.jpg)
.jpg)
Step 4: Cleaning and inspection
-
Clean the opening with a clean cloth to remove any metallic residue and debris.
-
Shake the racket over a bin to remove any remaining particles.
-
Inspect the hole: it should be clean, undeformed and undamaged.
-
This final check ensures a solid, durable and secure fixing during reassembly.
3 Solutions for Replacing Your Rivets !
Option 1 – High-end tubular rivets
The original model is installed using an industrial riveter
Option 2 – Stainless steel bolts + self-locking nuts
A durable and "ultra robust" solution suitable for all brands of snowshoes.
Option 3 – Tap-in rivets
An easy solution that is compatible with all brands of snowshoes.
Important: always place washers on the rivets or bolts and avoid overtightening to prevent crushing and weakening the binding materials.

Changing the heel straps
This simple method helps to preserve the other components (strap guide, buckle or button) and facilitates a quick and safe installation.
Type: multi-hole
-
Remove only the rivet that attaches the strap to the snowshoe.
-
Thread the strap through the strap loop;
-
Install the mounting components: clip, locking buckle, and/or heel pad.
-
Finish by installing the assembly components: 1 rivet or 1 bolt with 2 washers (1 old and 1 new).
Type: Buckle clips / Nylon
For a nylon strap: place the bolt head and one washer inside the harness, then add the strap, a washer, and the nut on the outside of the harness.
*Follow the safety instructions mentioned above.
.jpg)
.jpg)
The ideal solution to improve your straps !

Give your snowshoes a second life! Thanks to the Simard Sport Premium set of straps, which are flexible, robust and easy to install, you can quickly repair your equipment without compromising on comfort or performance.
👉 Order today and set off on your adventure with snowshoes that look like new!
.jpg)
Professional installation service !

If these steps seem complex, our ProShop workshop in Laval, Quebec, can perform the installation for you, using specialized tools and a durability guarantee.
📍 Simard Sport ProShop – Laval
Important: Read carefully the blog posts on snowshoe maintenance instructions and precautions for use.
⚠️ Disclaimer – Simard Sport: Simard Sport makes no representations, promises, or warranties regarding the accuracy, completeness, or suitability of the content of these installation or repair instructions. The company expressly disclaims all liability for errors, omissions, or damages resulting from improper use or installation of parts.
No warranty, express or implied, is given regarding the content of these instructions or the parts included in the repair or replacement kits.
Thank you for your trust, The Simard Sport .com Team