
DIY Repair & Installation Guide – ATLAS -Tubbs Snowshoe Harness Bindings
- Céline Simard, propriétaire de Simard Sport & Raquetteaneige

- Oct 27, 2025
- 4 min read
Updated: Jan 14
Simard Sport Quality
At Simard Sport, every ATLAS replacement snowshoe binding stands out for its proven durability, exceptional comfort, and optimal compatibility with most models — all with quick, easy installation.

Simard Sport Quality
At Simard Sport, every ATLAS replacement snowshoe binding stands out for its proven durability, exceptional comfort, and optimal compatibility with most models — all with quick, easy installation.
Upgrade Your ATLAS Snowshoes
Designed to withstand Canadian winters, our bindings provide a secure fit, consistent performance, and simple setup — all in service of your winter adventures.A simple, effective, and durable solution to extend and enhance the performance of your ATLAS snowshoes.
About This DIY Guide
This step-by-step DIY (Do It Yourself) guide walks you through installing your new bindings and safely removing a rivet.Before any repair, it’s essential to know how to remove a rivet without damaging the pivot of your ATLAS snowshoes.

How to Install Bindings on All ATLAS Snowshoe Models
Installation Guide — All ATLAS Models
⚠️ Caution: This procedure is intended for users with a solid understanding of tools and basic safety practices.
Always work carefully, on a stable, clear surface.
Wear safety glasses to prevent injury from flying metal, plastic, or debris.
Protect bystanders nearby.
Review your tool manuals before use.
👉 Need help?If the operation seems complex, entrust the installation to our ProShop workshop in Laval (Québec). Our qualified professionals complete the job at an affordable cost, with the equipment and expertise required for a reliable, durable, and safe result.
Important: Read all instructions carefully before starting, and follow the steps one by one.

🧰 List of Required Tools and Materials
Electric or cordless drill
1/4" drill bit
Locking pliers (vise-grip) or adjustable pliers
Rivet gun or Phillips screwdriver (for final assembly)
Additional locking pliers (recommended)
Fine file or sandpaper
Utility knife (X-Acto) & scissors
Safety glasses to protect from metal debris
Durable work gloves
Cutting lubricant
Clean cloth
Stable work surface
Waste bin for debris
Removing Existing Rivets — Aluminum Rivets (ATLAS)
Place your snowshoe on a stable, protected surface with good support.
Work from the top side of the snowshoe.
Locate the small central hole in each rivet head before proceeding.

— Securing and Drilling the Rivet
Firmly clamp both the underside and the top of the washer, as well as the rivet head (at the pivot), using locking pliers (vise-grip) to prevent any rotation during removal (see image).
Apply a small amount of lubricant to the rivet head to ease drilling.
Position the drill bit precisely at the center of the rivet head hole before starting to drill.
Keep the drill perpendicular to the surface.
Drill slowly

Monitor the temperature of the metal and the snowshoe pivot to prevent overheating.
Once the rivet head is fully drilled, remove the remaining pin and washer carefully.
Inspect the pivot strap to ensure it has not been damaged during the process.
💡 Pro Tips
Stability: Keep one hand on the drill and maintain a firm grip on the locking pliers for better control.
Control: If the rivet starts to spin, stop immediately, tighten the vise-grip, then resume slowly.
Alignment: Always keep the drill perpendicular to the surface for a clean and precise result.
Clean Finish: Before installing the new parts, remove all metal shavings and debris to ensure a proper fit and smooth operation.
Important: always place washers on the rivets or bolts and avoid overtightening to prevent crushing and weakening the binding materials.

🔧 Final Step — Assembly of All Parts
1️⃣ Remove the existing binding and cramponCarefully detach the binding and crampon from your snowshoe.Handle each part gently to avoid damaging the pivot.
2️⃣ Prepare the binding surfaceUsing a sharp utility knife (X-Acto), gently remove the anti-slip layer located on top of the binding (harness).From the old harness, cut out the anti-slip plate underneath using a strong pair of scissors.

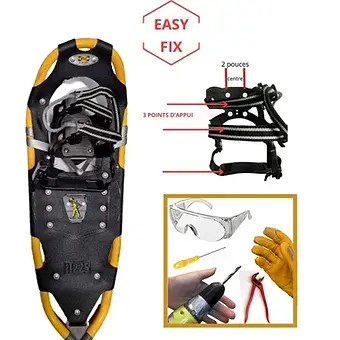
3️⃣ Assemble all componentsOnce the four parts are perfectly aligned and stacked — footplate, metal crampons, and bottom plate — place the complete assembly onto the existing toe cord.Secure everything carefully and firmly using rivets or bolts with lock nuts, depending on your preferred style and desired level of durability.
👉 Refer to the attached image to follow the correct positioning of each part and ensure a perfectly symmetrical, solid, and professional assembly.
Important : Important: always place washers on the rivets or bolts and avoid overtightening to prevent crushing and weakening the binding materials
.......................................
How to replace snowshoes heel strap replacement
This simple method helps preserve the other components (strap keeper, buckle, or button) and allows for quick and secure installation.
Remove only the rivet that secures the strap to the snowshoe.
Thread the strap through the strap keeper.
Install the mounting components: clip, locking buckle, and/or heel pad.
Finish by installing the assembly components: 1 rivet or 1 bolt with 2 washers (1 old and 1 new).
Follow the safety instructions mentioned above.


Professional Installation Option:
If any of these steps seem complex, our ProShop workshop in Laval (Québec) can handle the installation for you.The service is performed by qualified professionals at an affordable cost $50tx — ensuring a precise, durable, and professional result.

⚠️ Disclaimer – Simard Sport: Simard Sport makes no representations, promises, or warranties regarding the accuracy, completeness, or suitability of the contents of these installation or repair instructions. The company expressly disclaims any liability for errors, omissions, or damage resulting from improper use or installation of parts.
No warranty, expressed or implied, is given regarding the contents of these instructions or the parts included in repair or replacement kits .
Thank you for your trust, The Simard Sport .com team


Comments